Tampilkan postingan dengan label rom. Tampilkan semua postingan

Sabtu, 09 September 2017

[Guide] How To Flash a Custom ROM & Custom Recovery Via Odin [Updated]

Hey, guys welcome here and today we are going to tell you about that how to flash a custom rom via Odin and how to flash custom recovery via Odin in your Samsung smartphone. You can also flash stock firmware in Samsung devices via odin. Odin is the software which is made for Samsung devices only you can do all the things which are mention above in your Samsung smartphone. So without wasting the time lets get started to How To Flash a Custom ROM & Custom Recovery Via Odin.


Odin is a very useful Windows tool that lets you install stock firmware / flash Cuatom ROM on your Android device. Here is a step by step guide on how to use Odin to flash custom ROM on your Samsung smartphone

Before You Start

Install USB drivers for your device on your PC. You can unduh and install Samsung Kies which will automatically install device drivers.

Be sure to backup your data including Contacts, SMS / MMS, APN & MMS Settings as well as photos and videos stored on your device’s internal or external storage.

Make sure that your device is well charged. Ideally, the battery level should be around 60-80%. The more the better.

USB Debugging should be enabled on your device.

Make sure that Samsung Kies is not running

Downloads

1.Download Odin for Windows.

2.Custom ROM Zip


Note: We will not be responsible for any damage done to your device. Do it on your own risk.

How To Flash a Custom ROM & Custom Recovery Via Odin


First we are going to tell you about How To Flash Custom ROM via Odin in samsung devices.

Step 1: Unduh the official custom rom zip package for your device. Then extract the downloaded zip file. After extracting, you will either get one .tar / .tar.md5 file or will get multiple files.

If you get one file, it will have everything inside it: PDA + Phone + CSC.

If you get multiple files, there will be separate files for PDA, Phone & CSC.

Step 2: Download Odin3_v3.04.zip and extract the downloaded zip file. You will get following files:

1.Odin3 v3.04.exe
2.tmax.dll
3.zlib.dll
4.Odin3.ini

Step 3: Right click on Odin3 v3.04.exe and run it as eksekutif to start Odin.

Step 4: Boot your device in unduh mode. For most Samsung devices, you will need to do this:

Switch your device off.

Press & hold Power + Home + Volume down buttons till you see a triangle and Android robot.

Now press the Volume up button to confirm entering the unduh mode.

Step 5: Once it is in unduh mode, connect your device to the computer via USB cable.

When your device is connected, one of Odin ID:COM boxes will turn yellow and display the COM port number

Step 6: If the rom zip package had just one file, click on PDA button, then browse and select the firmware file (.tar or .tar.md5).

If the firmware package had multiple files:

Click on PDA button, then browse and select the file that has CODE / PDA in its name.

Click on Phone button and select the file that has MODEM in its name.

Click on CSC button and select the file with CSC in its name.

Skip any files that you did not find in the package.

Make sure that you do not mess up with checkboxes:

Auto Reboot and F. Reset Time checkboxes should be selected

All other checkboxes should be unchecked.

After selecting the appropriate files, click on “Start” button in Odin.

This will kick off the process to flash the ROM. Please do not disconnect your device during the process. Once flashing is complete, your device will reboot. You can now disconnect from the PC and start using it. SO guys this is all about How To Flash Custom ROM via Odin in samsung devices.

That’s it. You can use these steps to flash custom ROM on your samsung device using Odin.

Now We are going to talk about How To Flash/Install Custom Recovery via Odin in Samsung devices


How To Flash/Install Custom Recovery via Odin
Custom recovery developed and maintained by the folks over at TeamWin. Using TWRP, you can take full device (nandroid) backups, plus install/flash rooting scripts like SuperSU, Custom ROMs/MODs and other similar stuff. TWRP recovery is available as both official and unofficial builds.

Step 1: Unzip the file and run/open Odin.exe file from the extracted files on your PC.

Make sure you’ve downloaded a Odin flashable TWRP recovery .tar file compatible for your device.

(If applicable) Enable OEM unlock:

Go to Settings » About phone » and tap Build number seven times to enable Developer options.

Step 2: Go back to main Settings page, scroll to bottom and select Developer options from there.

Step 3: Under Developer options, look for Enable OEM unlock checkbox/toggle and enable it.

Boot your device into Unduh mode:

Switch off your device.


Press and hold “Home + Power + Volume down” buttons for a few seconds until you see a warning screen.

Press Volume Up on the warning screen to accept it and boot into Unduh mode.

Step 4: Once your device is in unduh mode, connect it to the PC with a USB cable. The Odin window on PC should detect the device and show an “Added!!” message.

Step 5: Now click on the AP tab on Odin window and select the TWRP recovery .tar file that you downloaded for your device.

Note: DON’T play with any other options on the screen. You’re only required to connect your device and select the TWRP recovery .tar file in the AP tab.

Step 6: Click the Start button on Odin and wait for it to finish the process. Once it has finished successfully, you’ll see a pass message on the Odin screen.

Your device will automatically reboot when Odin is done flashing. You can then disconnect your device.


So guys this is all about How To Flash a Custom ROM & Custom Recovery Via Odin follow the steps carefully and if you need any help just comment below we will reply you asap. Keep visiting <3

[Unofficial] Unduh LineageOS Honor 8 Pro (duk) Nougat 7.1.1

Download Unofficial Lineage OS For Honor 8 Pro (duk) Nougat 7.1.1. Unofficial Lineage os is based on the Android Open Source Project with extra contributions from many people within the Android community. It can be used without any need to have any Google application installed. Unofficial LineageOS does still include various hardware-specific code, which is also slowly being open-sourced anyway.


DISCLAIMER:


THIS IS AN INITIAL BUILD WHICH MAY NOT BOOT AT ALL. HAVE A BACKUP BEFORE FLASHING THIS AND TRY AT YOUR OWN RISK.

Installing a custom ROM on a Honor 8 Pro (duk) requires the bootloader to be unlocked on the Honor 8 Pro (duk) phone, which may VOID your warranty and may delete all your data. Before proceeding further you may consider backup all data on the phone. You are the only person doing changes to your phone and I cannot be held responsible for the mistakes done by you.

Status of Unofficial Lineage os for Honor 8 Pro (duk) Nougat 7.1 Custom ROM:

KNOWN ISSUES:
Rear Video Camera Recording working only with OpenCamera and set FPS to 15
* Encryption


Before Starting

Take care of following tasks before you proceed with flashing custom ROM:
Task 1: Install USB drivers for your device on your PC.
Task 2: Be sure to backup your data including Contacts, SMS / MMS, APN & MMS Settings as well as photos and videos stored on your device’s internal or external storage.
Task 3: Make sure that your device is well charged. Ideally, the battery level should be around 60-80%. The more the better.
Task 4: USB Debugging should be enabled on your device.
Important: Most of the custom ROM will not have Google Apps in them. So, you will have to unduh and install GApps manually.Also take nandroid backup before installing

Done with preliminary precautionary steps? So, here’s the guide:

TWRP recovery let’s you do a number of cool stuff but the whole point of having a custom recovery is to be able to flash unsigned .zip files. These .zip files could be anything from a custom kernel, boot, recovery, MODs or full custom ROMs.


Let’s see how to flash a lineage os rom on Honor 8 Pro (duk) using TWRP recovery.

How to Install a Unofficial Lineageos on Honor 8 Pro (duk)


  1. Download and transfer the unofficial Lineage os ROM and Gapps for linage os you wish to flash to your device’s storage.
  2. Boot your device into TWRP recovery.
  3. Select “Wipe” from TWRP main menu and do a “Swipe to Factory Reset” on the bottom of screen.
    └ Note: This will factory reset your device. If your custom ROM doesn’t require a factory reset, then simply skip this step.
  4. Go back to TWRP main menu, tap on “Install” [ first time flashing the rom over emui 5? flash vendor.zip ] then select the unofficial Lineage os  ROM .zip file and gapps for lineage os that you transferred to your device in Step 1.
  5. After selecting the .zip file, do “Swipe to Confirm Flash” on the bottom of screen to begin the custom ROM installation process. This may take some time.
  6. Once your ROM is successfully flashed, you’ll see “Wipe cache/dalvik” option, select it and then do “Swipe to wipe” on bottom of screen.
  7. Once cache & dalvik wipe completes, hit the “Back” button on-screen and then select “Reboot System” button.

DOWNLOAD UNOFFICIAL LINEAGE OS FOR Honor 8 Pro (duk)


1.Download Gapps for UnOfficial Lineage OS 7.1.1

2.Download Unofficial Lineage os 14.1 for Honor 8 Pro (duk) 


3.Download Vendor.zip

4.How to Root Lineage OS rom Easily


|| SOurce

[Official] Unduh MIUI 9 for Xiaomi Mi 6 [Global]

Welcome to lineageosroms as we all know MIUI 9 (based on android Nougat 7.0)will be the next latest android OS for All Xiaomi devices and you are curious to know which device will get MIUI 9 that is based on latest android Nougat 7.0 in this tutorial we explained how to download MIUI 9 rom and install latest MIUI 9 rom on Xiaomi Mi 6 .Are you curious to test the latest stable verison of your device but haven’t received the update.Do not be upset, you can still enjoy the ROM by unduh from the below steps.

Download MIUI 9 Rom for any Xiaomi Device.The Xiaomi Mi 6  sports a 13-megapixel rear camera with PDAF (phase detection autofocus), an f/2.0 aperture and dual-tone LED flash. The 5-megapixel front camera sports an 84-degree wide angle lens.It comes with Snapdragon 625 Octacore Processor.It comes with 4100 mAh battery capacity which can last for more than two days with mixed usage.You can expand its memory upto 128 GB via a micro SD-Card.Today in this tutorial we are going to show you how you can install MIUI 9 on your Xiaomi Mi 6 .

Requirements:
1.This method is only for the Xiaomi Mi 6 .Do not try it on any other device.
2.It is advisable to take a backup of your device before proceeding further.
3.Ensure that your phone has at least 70-80% charged to prevent the accidental shutdown in-between the process.

Downloads

1.Download MIUI 9 for Xiaomi Mi 6  Qualcomm /4X


How TO INSTALL MIUI 9 On Xiaomi Mi 6 

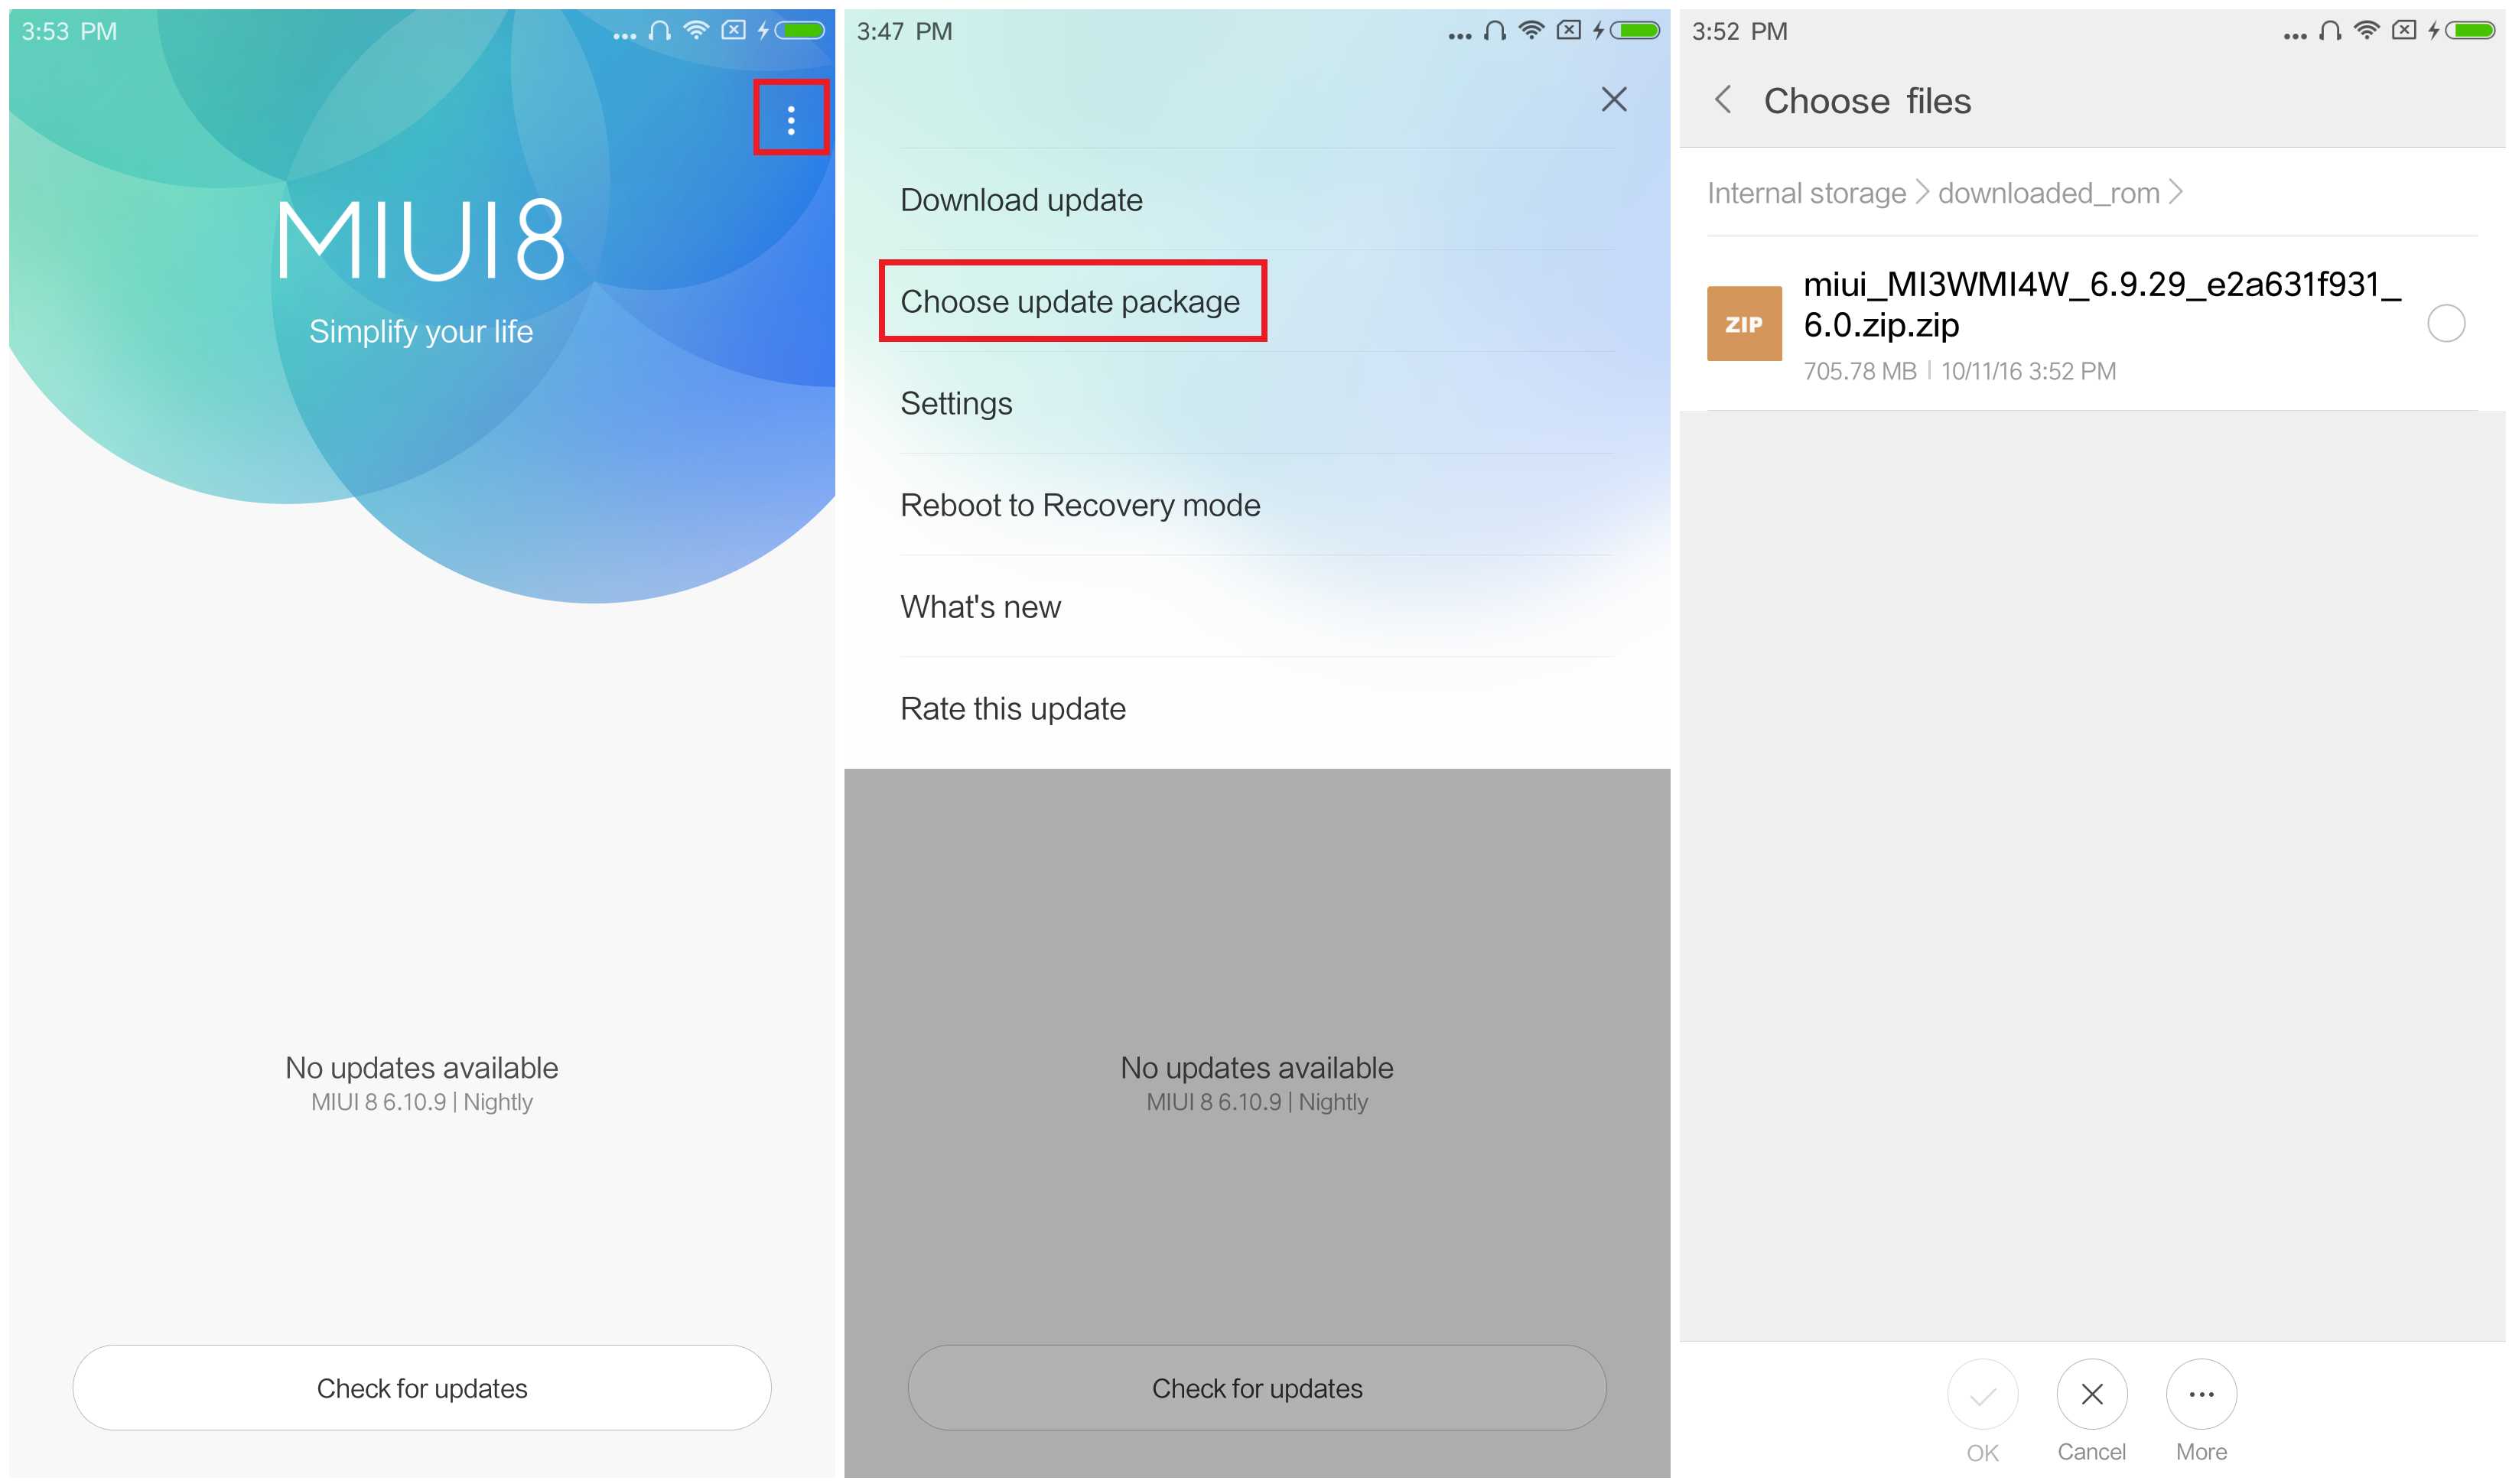
  • Connect your device to the Windows PC/laptop via a micro USB cable, and copy the ROM file downloaded in Step 1 into the folder ‘downloaded_rom’ in the internal storage of your device.
  • Launch ‘Updater’ app on your device:


  • MIUI 6/7/8:Click the ‘…’ icon at the top-right corner, select ‘Choose update package’, and choose the ROM file you’ve put in ‘downloaded_rom’ in Step 2.
  • MIUI V5:Press the Menu button, select ‘Choose update package’, and choose the ROM file you’ve put in ‘downloaded_rom’ in Step 2.
  • After choosing the right ROM file, your device will begin upgrading. Your device should automatically boot to the new version when the update is completed.
  • After choosing the right ROM file, your device will begin upgrading. Your device should automatically boot to the new version when the update is completed.

lineagosrom.com is not responsible for any damage happened to your device(s) while following this guide, Proceed at your own risk.Install MIUI 9 rom at your own risk.


If you see the following image after rebooting, it means that you have succeeded in flashing MIUI ROM.

If still any queries left in your mind, feel free to ask via comment section.

[Unofficial] Unduh Android Oreo ROM Mi4 (Cancro) Oreo 8.0

Download Unofficial Android Oreo For Mi4 (Cancro) Oreo 8.0. Unofficial Android Oreo is based on the Android Open Source Project with extra contributions from many people within the Android community. It can be used without any need to have any Google application installed. Unofficial Android Oreo does still include various hardware-specific code, which is also slowly being open-sourced anyway.


DISCLAIMER:


THIS IS AN INITIAL BUILD WHICH MAY NOT BOOT AT ALL. HAVE A BACKUP BEFORE FLASHING THIS AND TRY AT YOUR OWN RISK.

Installing a custom ROM on a Mi4 (Cancro) requires the bootloader to be unlocked on the Mi4 (Cancro) phone, which may VOID your warranty and may delete all your data. Before proceeding further you may consider backup all data on the phone. You are the only person doing changes to your phone and I cannot be held responsible for the mistakes done by you.Learn more about Android Oreo here.

Status of Unofficial Android Oreo for Mi4 (Cancro) Oreo 8.0 Custom ROM:

Whats working?
Ril
Camera
Wifi
Bluetooth
Sensors
Everything that is important
Whats not?
Nothing major


Before Starting

Take care of following tasks before you proceed with flashing custom ROM:
Task 1: Install USB drivers for your device on your PC.
Task 2: Be sure to backup your data including Contacts, SMS / MMS, APN & MMS Settings as well as photos and videos stored on your device’s internal or external storage.
Task 3: Make sure that your device is well charged. Ideally, the battery level should be around 60-80%. The more the better.
Task 4: USB Debugging should be enabled on your device.
Important: Most of the custom ROM will not have Google Apps in them. So, you will have to unduh and install GApps manually.Also take nandroid backup before installing

Done with preliminary precautionary steps? So, here’s the guide:

TWRP recovery let’s you do a number of cool stuff but the whole point of having a custom recovery is to be able to flash unsigned .zip files. These .zip files could be anything from a custom kernel, boot, recovery, MODs or full custom ROMs.


Let’s see how to flash a Android Oreo rom on Mi4 (Cancro) using TWRP recovery.

How to Install a unofficial Android Oreo on Mi4 (Cancro)


  1. Download and transfer the unofficial Android Oreo ROM and Gapps for android oreo you wish to flash to your device’s storage.
  2. Boot your device into TWRP recovery.
  3. Select “Wipe” from TWRP main menu and do a “Swipe to Factory Reset” on the bottom of screen.
    └ Note: This will factory reset your device. If your custom ROM doesn’t require a factory reset, then simply skip this step.
  4. Go back to TWRP main menu, tap on “Install” and select the unofficial Android Oreo  ROM .zip file and gapps for Android Oreo that you transferred to your device in Step 1.
  5. After selecting the .zip file, do “Swipe to Confirm Flash” on the bottom of screen to begin the custom ROM installation process. This may take some time.
  6. Once your ROM is successfully flashed, you’ll see “Wipe cache/dalvik” option, select it and then do “Swipe to wipe” on bottom of screen.
  7. Once cache & dalvik wipe completes, hit the “Back” button on-screen and then select “Reboot System” button.

DOWNLOAD UNOFFICIAL ANDROID OREO FOR Mi4 (Cancro)


1.Download Gapps for Unofficial Android Oreo 8.0

2.How to Root Android Oreo


source: XDA

[Unofficial] Unduh Android Oreo ROM Mi3 (Cancro) Oreo 8.0

Download Unofficial Android Oreo For Xiaomi Mi3 (Cancro) Oreo 8.0. Unofficial Android Oreo is based on the Android Open Source Project with extra contributions from many people within the Android community. It can be used without any need to have any Google application installed. Unofficial Android Oreo does still include various hardware-specific code, which is also slowly being open-sourced anyway.


DISCLAIMER:


THIS IS AN INITIAL BUILD WHICH MAY NOT BOOT AT ALL. HAVE A BACKUP BEFORE FLASHING THIS AND TRY AT YOUR OWN RISK.

Installing a custom ROM on a Xiaomi Mi3 (Cancro) requires the bootloader to be unlocked on the Xiaomi Mi3 (Cancro) phone, which may VOID your warranty and may delete all your data. Before proceeding further you may consider backup all data on the phone. You are the only person doing changes to your phone and I cannot be held responsible for the mistakes done by you.Learn more about Android Oreo here.

Status of Unofficial Android Oreo for Xiaomi Mi3 (Cancro) Oreo 8.0 Custom ROM:

Whats working?
Ril
Camera
Wifi
Bluetooth
Sensors
Everything that is important
Whats not?
Nothing major


Before Starting

Take care of following tasks before you proceed with flashing custom ROM:
Task 1: Install USB drivers for your device on your PC.
Task 2: Be sure to backup your data including Contacts, SMS / MMS, APN & MMS Settings as well as photos and videos stored on your device’s internal or external storage.
Task 3: Make sure that your device is well charged. Ideally, the battery level should be around 60-80%. The more the better.
Task 4: USB Debugging should be enabled on your device.
Important: Most of the custom ROM will not have Google Apps in them. So, you will have to unduh and install GApps manually.Also take nandroid backup before installing

Done with preliminary precautionary steps? So, here’s the guide:

TWRP recovery let’s you do a number of cool stuff but the whole point of having a custom recovery is to be able to flash unsigned .zip files. These .zip files could be anything from a custom kernel, boot, recovery, MODs or full custom ROMs.


Let’s see how to flash a Android Oreo rom on Xiaomi Mi3 (Cancro) using TWRP recovery.

How to Install a unofficial Android Oreo on Xiaomi Mi3 (Cancro)


  1. Download and transfer the unofficial Android Oreo ROM and Gapps for android oreo 8.0 you wish to flash to your device’s storage.
  2. Boot your device into TWRP recovery.
  3. Select “Wipe” from TWRP main menu and do a “Swipe to Factory Reset” on the bottom of screen.
    └ Note: This will factory reset your device. If your custom ROM doesn’t require a factory reset, then simply skip this step.
  4. Go back to TWRP main menu, tap on “Install” and select the unofficial Android Oreo  ROM .zip file and gapps for Android Oreo that you transferred to your device in Step 1.
  5. After selecting the .zip file, do “Swipe to Confirm Flash” on the bottom of screen to begin the custom ROM installation process. This may take some time.
  6. Once your ROM is successfully flashed, you’ll see “Wipe cache/dalvik” option, select it and then do “Swipe to wipe” on bottom of screen.
  7. Once cache & dalvik wipe completes, hit the “Back” button on-screen and then select “Reboot System” button.

DOWNLOAD UNOFFICIAL ANDROID OREO FOR Xiaomi Mi3 (Cancro)


1.Download Gapps for Unofficial Android Oreo 8.0

2.How to Root Android Oreo


source: XDA

[ROM] Unduh Android Oreo 8.0 Moto G4 Play (Harpia)

Download Android oreo 8.0 rom Moto G4 Play (Harpia) . Android oreo 8.0 is based on the Android Open Source Project with extra contributions from many people within the Android community. It can be used without any need to have any Google application installed. Android Oreo 8.0 does still include various hardware-specific code, which is also slowly being open-sourced anyway.

DISCLAIMER:


THIS IS AN INITIAL BUILD WHICH MAY NOT BOOT AT ALL. HAVE A BACKUP BEFORE FLASHING THIS AND TRY AT YOUR OWN RISK.

Installing a custom ROM on a Moto G4 Play (Harpia) requires the bootloader to be unlocked on the Moto G4 Play (Harpia) phone, which may VOID your warranty and may delete all your data. Before proceeding further you may consider backup all data on the phone. You are the only person doing changes to your phone and I cannot be held responsible for the mistakes done by you.

Status of  Android oreo 8.0 for Moto G4 Play (Harpia) Custom ROM:

WHAT’S WORKING:
– Not Known
KNOWN ISSUES:
– Not Known


Before Starting

Take care of following tasks before you proceed with flashing custom ROM:
Task 1: Install USB drivers for your device on your PC.
Task 2: Be sure to backup your data including Contacts, SMS / MMS, APN & MMS Settings as well as photos and videos stored on your device’s internal or external storage.
Task 3: Make sure that your device is well charged. Ideally, the battery level should be around 60-80%. The more the better.
Task 4: USB Debugging should be enabled on your device.
Important: Most of the custom ROM will not have Google Apps in them. So, you will have to unduh and install GApps manually.Also take nandroid backup before installing

Done with preliminary precautionary steps? So, here’s the guide:

TWRP recovery let’s you do a number of cool stuff but the whole point of having a custom recovery is to be able to flash unsigned .zip files. These .zip files could be anything from a custom kernel, boot, recovery, MODs or full custom ROMs.


Let’s see how to flash a Android oreo 8.0 rom on Moto G4 Play (Harpia) using TWRP recovery.

How to Install an Android Oreo 8.0 on Moto G4 Play (Harpia)


  1. Download and transfer the Android oreo 8.0 ROM and Gapps for android oreo you wish to flash to your device’s storage.
  2. Boot your device into TWRP recovery.
  3. Select “Wipe” from TWRP main menu and do a “Swipe to Factory Reset” on the bottom of screen.
    └ Note: This will factory reset your device. If your custom ROM doesn’t require a factory reset, then simply skip this step.
  4. Go back to TWRP main menu, tap on “Install” and select the Android oreo 8.0  ROM .zip file and gapps for Android oreo 8.0 that you transferred to your device in Step 1.
  5. After selecting the .zip file, do “Swipe to Confirm Flash” on the bottom of screen to begin the custom ROM installation process. This may take some time.
  6. Once your ROM is successfully flashed, you’ll see “Wipe cache/dalvik” option, select it and then do “Swipe to wipe” on bottom of screen.
  7. Once cache & dalvik wipe completes, hit the “Back” button on-screen and then select “Reboot System” button.

DOWNLOAD ANDROID OREO 8.0 FOR Moto G4 Play (Harpia)


1.Download Gapps for Android oreo 8.0

2.How to Root Android oreo 8.0 rom Easily

[ROM] Unduh Android Oreo 8.0 Yu Yuphoria (Lettuce)

Download Android oreo 8.0 For Yu Yuphoria (Lettuce). Android oreo 8.0 is based on the Android Open Source Project with extra contributions from many people within the Android community. It can be used without any need to have any Google application installed. Android Oreo 8.0 does still include various hardware-specific code, which is also slowly being open-sourced anyway.


DISCLAIMER:


THIS IS AN INITIAL BUILD WHICH MAY NOT BOOT AT ALL. HAVE A BACKUP BEFORE FLASHING THIS AND TRY AT YOUR OWN RISK.

Installing a custom ROM on a Yu Yuphoria (Lettuce) requires the bootloader to be unlocked on the Yu Yuphoria (Lettuce) phone, which may VOID your warranty and may delete all your data. Before proceeding further you may consider backup all data on the phone. You are the only person doing changes to your phone and I cannot be held responsible for the mistakes done by you.

Status of  Android oreo 8.0 for Yu Yuphoria (Lettuce) Custom ROM:

WHAT’S WORKING:
– Not Known
KNOWN ISSUES:
– Not Known


Before Starting

Take care of following tasks before you proceed with flashing custom ROM:
Task 1: Install USB drivers for your device on your PC.
Task 2: Be sure to backup your data including Contacts, SMS / MMS, APN & MMS Settings as well as photos and videos stored on your device’s internal or external storage.
Task 3: Make sure that your device is well charged. Ideally, the battery level should be around 60-80%. The more the better.
Task 4: USB Debugging should be enabled on your device.
Important: Most of the custom ROM will not have Google Apps in them. So, you will have to unduh and install GApps manually.Also take nandroid backup before installing

Done with preliminary precautionary steps? So, here’s the guide:

TWRP recovery let’s you do a number of cool stuff but the whole point of having a custom recovery is to be able to flash unsigned .zip files. These .zip files could be anything from a custom kernel, boot, recovery, MODs or full custom ROMs.


Let’s see how to flash a Android oreo 8.0 rom on Yu Yuphoria (Lettuce) using TWRP recovery.

How to Install a Android Oreo 8.0 on Yu Yuphoria (Lettuce)


  1. Download and transfer the Android oreo 8.0 ROM and Gapps for linage os you wish to flash to your device’s storage.
  2. Boot your device into TWRP recovery.
  3. Select “Wipe” from TWRP main menu and do a “Swipe to Factory Reset” on the bottom of screen.
    └ Note: This will factory reset your device. If your custom ROM doesn’t require a factory reset, then simply skip this step.
  4. Go back to TWRP main menu, tap on “Install” and select the Android oreo 8.0  ROM .zip file and gapps for Android oreo 8.0 that you transferred to your device in Step 1.
  5. After selecting the .zip file, do “Swipe to Confirm Flash” on the bottom of screen to begin the custom ROM installation process. This may take some time.
  6. Once your ROM is successfully flashed, you’ll see “Wipe cache/dalvik” option, select it and then do “Swipe to wipe” on bottom of screen.
  7. Once cache & dalvik wipe completes, hit the “Back” button on-screen and then select “Reboot System” button.

DOWNLOAD ANDROID OREO 8.0 FOR Yu Yuphoria (Lettuce)


1.Download Gapps for Android oreo 8.0

2.How to Root Android oreo 8.0 rom Easily